概念
Spring IOC
Spring 容器是 Spring 框架的核心。容器将创建对象,把它们连接在一起,配置它们,并管理他们的整个生命周期从创建到销毁。Spring 容器使用依赖注入(DI)来管理组成一个应用程序的组件。这些对象被称为 Spring Beans。
IOC 容器具有依赖注入功能的容器,它可以创建对象,IOC 容器负责实例化、定位、配置应用程序中的对象及建立这些对象间的依赖。通常new一个实例,控制权由程序员控制,而”控制反转”是指new实例工作不由程序员来做而是交给Spring容器来做。
Spring的容器:
- Spring BeanFactory 容器
- Spring ApplicationContext 容器
BeanFactory
这个容器从一个 XML 文件中读取配置元数据,由这些元数据来生成一个被配置化的系统或者应用。1
2
3
4
5
6
7
8
9
10
11
12
13import org.springframework.beans.factory.BeanFactory;
import org.springframework.beans.factory.support.BeanDefinitionReader;
import org.springframework.beans.factory.support.BeanDefinitionRegistry;
import org.springframework.beans.factory.support.DefaultListableBeanFactory;
import org.springframework.beans.factory.xml.XmlBeanDefinitionReader;
import org.springframework.core.io.ClassPathResource;
import org.springframework.core.io.Resource;
// 注册
BeanFactory factory=new DefaultListableBeanFactory();
BeanDefinitionReader reader=new XmlBeanDefinitionReader((BeanDefinitionRegistry) factory);
reader.loadBeanDefinitions(new ClassPathResource("beans.xml"));
// getbean
ServiceBean service = (ServiceBean)factory.getBean("service");
ApplicationContext
Application Context 是BeanFactory的子接口,也被成为Spring上下文。与BeanFactory类似,但是它增加了企业所需要的功能,比如,从属性文件中解析文本信息和将事件传递给所指定的监听器。1
2
3
4
5
6
7
8
9
10
11
12
13
14
15
16
17import org.springframework.context.ApplicationContext;
import org.springframework.context.support.FileSystemXmlApplicationContext;
ApplicationContext context = new FileSystemXmlApplicationContext("Beans.xml");
HelloWorld obj = (HelloWorld) context.getBean("helloWorld");
obj.getMessage();
....
public class HelloWorld {
private String message;
public void setMessage(String message){
this.message = message;
}
public void getMessage(){
System.out.println("Your Message : " + message);
}
}
Bean
被称作 bean 的对象是构成应用程序的支柱也是由 Spring IoC 容器管理的。bean 是一个被实例化,组装,并通过 Spring IoC 容器所管理的对象。
bean的配置需要元数据信息。包括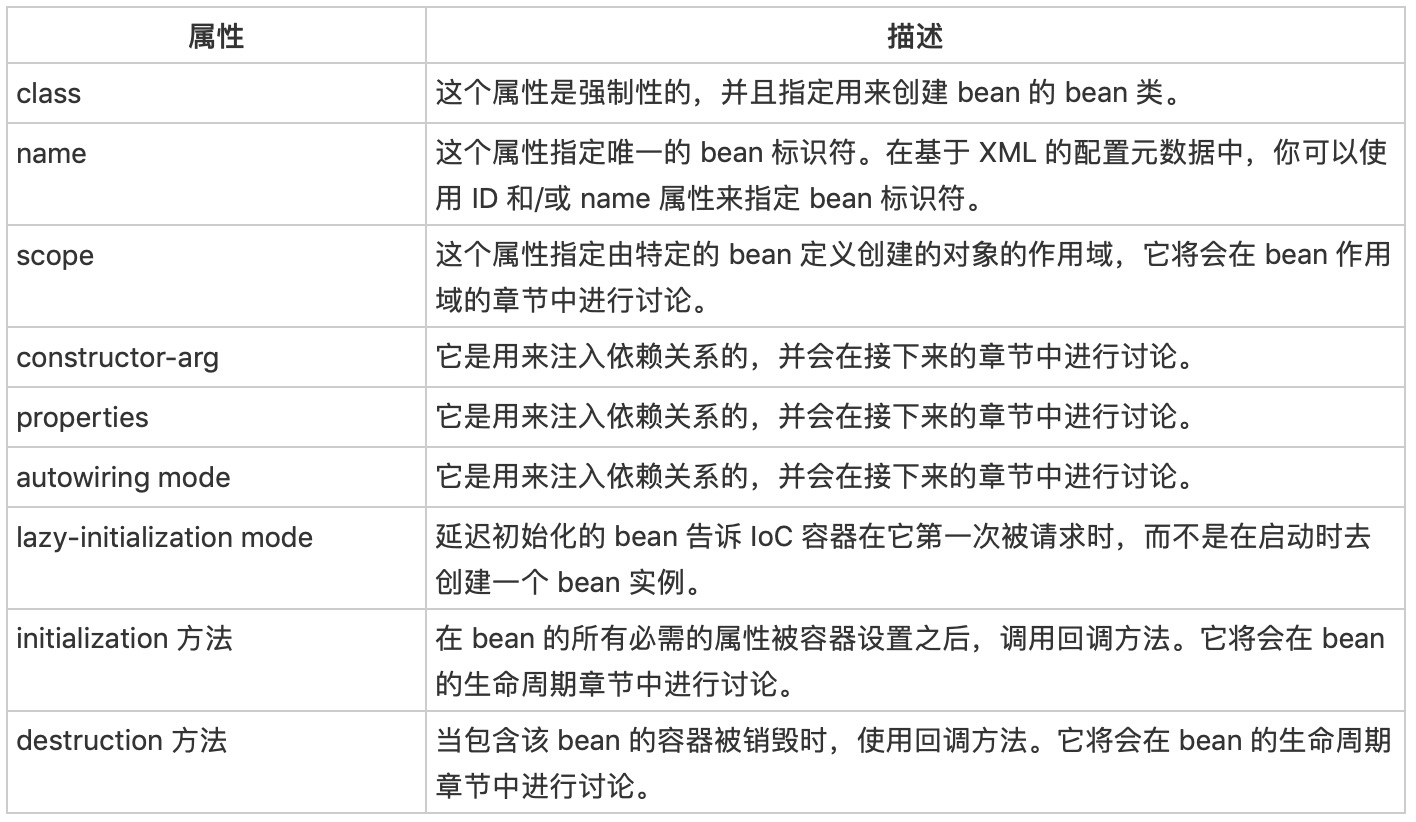
- 作用域:
- singleton:在spring IoC容器仅存在一个Bean实例,Bean以单例方式存在,默认值
- prototype:每次从容器中调用Bean时,都返回一个新的实例,即每次调用getBean()时,相当于执行newXxxBean()
- request:每次HTTP请求都会创建一个新的Bean,该作用域仅适用于WebApplicationContext环境
- session:同一个HTTP Session共享一个Bean,不同Session使用不同的Bean,仅适用于WebApplicationContext环境
- global session:一般用于Portlet应用环境,该运用域仅适用于WebApplicationContext环境
生命周期
初始化回调
1
2
3
4
5
6
7
8import org.springframework.beans.factory.InitializingBean
public class ExampleBean implements InitializingBean {
public void afterPropertiesSet() {
// do some initialization work
}
}
// 或者在xml定义
<bean id="exampleBean" class="examples.ExampleBean" init-method="afterPropertiesSet"/>销毁回调
1
2
3
4
5
6
7
8import org.springframework.beans.factory.DisposableBean
public class ExampleBean implements DisposableBean {
public void destroy() {
// do some destruction work
}
}
// 或者在xml定义
<bean id="exampleBean" class="examples.ExampleBean" destroy-method="destroy"/>
后置处理器:
BeanPostProcessor- 继承
Spring Bean 定义的继承与 Java 类的继承无关,但是继承的概念是一样的。你可以定义一个父 bean 的定义作为模板和其他子 bean 就可以从父 bean 中继承所需的配置。1
<bean id="helloIndia" class="com.tutorialspoint.HelloIndia" parent="helloWorld">
Spring 依赖注入
基于构造函数的依赖注入
当容器调用带有一组参数的类构造函数时,基于构造函数的 DI 就完成了,其中每个参数代表一个对其他类的依赖。1
2
3
4
5
6package x.y;
public class Foo {
public Foo(Bar bar, Baz baz) {
// ...
}
}
beans.xml1
2
3
4
5
6
7
8
9<beans>
<bean id="foo" class="x.y.Foo">
<constructor-arg ref="bar"/>
<constructor-arg ref="baz"/>
</bean>
<bean id="bar" class="x.y.Bar"/>
<bean id="baz" class="x.y.Baz"/>
</beans>
main.java1
2
3
4
5
6
7public class MainApp {
public static void main(String[] args) {
ApplicationContext context = new ClassPathXmlApplicationContext("Beans.xml");
Foo te = (Foo) context.getBean("foo");
te.xxxx();
}
}
基于设值函数的依赖注入
当容器调用一个无参的构造函数或一个无参的静态 factory 方法来初始化你的 bean 后,通过容器在你的 bean 上调用设值函数,基于设值函数的 DI 就完成了。1
2
3
4
5
6
7
8
9
10
11
12
13
14
15
16package com.tutorialspoint;
public class TextEditor {
private SpellChecker spellChecker;
public void setSpellChecker(SpellChecker spellChecker) {
System.out.println("Inside setSpellChecker." );
this.spellChecker = spellChecker;
}
public SpellChecker getSpellChecker() {
return spellChecker;
}
public void spellCheck() {
spellChecker.checkSpelling();
}
}
beans.xml1
2
3
4
5<bean id="textEditor" class="com.tutorialspoint.TextEditor">
<property name="spellChecker" ref="spellChecker"/>
</bean>
<bean id="spellChecker" class="com.tutorialspoint.SpellChecker"></bean>
main.java1
2
3
4
5
6
7public class MainApp {
public static void main(String[] args) {
ApplicationContext context = new ClassPathXmlApplicationContext("Beans.xml");
TextEditor te = (TextEditor) context.getBean("textEditor");
te.spellCheck();
}
}
内部bean
Java 内部类是在其他类的范围内被定义的,同理,inner beans 是在其他 bean 的范围内定义的 bean。1
2
3
4
5<bean id="outerBean" class="...">
<property name="target">
<bean id="innerBean" class="..."/>
</property>
</bean>
注入集合
包括 Java Collection 类型 List、Set、Map 和 Properties1
2
3
4
5
6
7
8
9
10
11 <bean id="javaCollection" class="com.tutorialspoint.JavaCollection">
<!-- results in a setAddressList(java.util.List) call -->
<property name="addressList">
<list>
<value>INDIA</value>
<value>Pakistan</value>
<value>USA</value>
<value>USA</value>
</list>
</property>
</bean>
Spring Bean 的自动装配
在上面说明了通过\
也可以使用\
模式:
- no: 这是默认的设置,它意味着没有自动装配,你应该使用显式的bean引用来连线。
byName: 由属性名自动装配。Spring 容器看到在 XML 配置文件中 bean 的自动装配的属性设置为 byName。
1
2
3
4
5
6<bean id="textEditor" class="com.tutorialspoint.TextEditor" autowire="byName">
<property name="name" value="Generic Text Editor" />
</bean>
<bean id="spellChecker" class="com.tutorialspoint.SpellChecker">
</bean>byType: 由属性数据类型自动装配。Spring 容器看到在 XML 配置文件中 bean 的自动装配的属性设置为 byType。
- constructor: 类似于 byType,但该类型适用于构造函数参数类型。
- autodetect: Spring首先尝试通过 constructor 使用自动装配来连接,如果它不执行,Spring 尝试通过 byType 来自动装配。
基于注解的配置
从 Spring 2.5 开始就可以使用注解来配置依赖注入。而不是采用 XML 来描述一个 bean 连线,你可以使用相关类,方法或字段声明的注解,将 bean 配置移动到组件类本身。
打开注解配置需要在bean.xml中配置1
<context:annotation-config/>
@Required
@Required 注释应用于 bean 属性的 setter 方法,它表明受影响的 bean 属性在配置时必须放在 XML 配置文件中,否则容器就会抛出一个 BeanInitializationException 异常。1
2
3
4
5
6
7
8
9
10
11
12
13
14
15
16
17
18
19import org.springframework.beans.factory.annotation.Required;
public class Student {
private Integer age;
private String name;
public void setAge(Integer age) {
this.age = age;
}
public Integer getAge() {
return age;
}
public void setName(String name) {
this.name = name;
}
public String getName() {
return name;
}
}
beans.xml1
2
3
4<bean id="student" class="com.tutorialspoint.Student">
<property name="name" value="Zara" />
<property name="age" value="11"/> // 如果没有写这个属性会报错
</bean>
@Autowired
@Autowired 注释对在哪里和如何完成自动连接提供了更多的细微的控制。
可以在beans.xml文件中配置autowired。当Spring遇到一个在 setter方法中使用的 @Autowired 注释,它会在方法中视图执行 byType 自动连接。1
2
3
4
5
6
7
8
9
10
11
12
13
14import org.springframework.beans.factory.annotation.Autowired;
public class TextEditor {
private SpellChecker spellChecker;
public TextEditor() {
System.out.println("Inside TextEditor constructor." );
}
public SpellChecker getSpellChecker( ){
return spellChecker;
}
public void spellCheck(){
spellChecker.checkSpelling();
}
}
beans.xml1
2
3
4
5<bean id="textEditor" class="com.tutorialspoint.TextEditor">
</bean>
<bean id="spellChecker" class="com.tutorialspoint.SpellChecker">
</bean>
@Qualifier 注释
当你创建多个具有相同类型的 bean 时,并且想要用一个属性只为它们其中的一个进行装配,在这种情况下,你可以使用 @Qualifier 注释和 @Autowired 注释通过指定哪一个真正的 bean 将会被装配来消除混乱。1
2
3
4
5
6
7
8
9
10
11
12
13
14
15
16import org.springframework.beans.factory.annotation.Autowired;
import org.springframework.beans.factory.annotation.Qualifier;
public class Profile {
("student1")
private Student student;
public Profile(){
System.out.println("Inside Profile constructor." );
}
public void printAge() {
System.out.println("Age : " + student.getAge() );
}
public void printName() {
System.out.println("Name : " + student.getName() );
}
}
beans.xml1
2
3
4
5
6
7
8
9
10
11
12 <bean id="profile" class="com.tutorialspoint.Profile">
</bean>
<bean id="student1" class="com.tutorialspoint.Student">
<property name="name" value="Zara" />
<property name="age" value="11"/>
</bean>
<bean id="student2" class="com.tutorialspoint.Student">
<property name="name" value="Nuha" />
<property name="age" value="2"/>
</bean>
JSR-250 注释
- @PostConstruct: 初始化回调函数的一个替代
- @PreDestroy: 销毁回调函数的一个替代
- @Resource: 使用一个 ‘name’ 属性,该属性以一个 bean 名称的形式被注入。你可以说,它遵循 by-name 自动连接语义
1
2
3
4
5
6
7
8
9
10
11
12
13public class TextEditor {
private SpellChecker spellChecker;
(name= "spellChecker")
public void setSpellChecker( SpellChecker spellChecker ){
this.spellChecker = spellChecker;
}
public SpellChecker getSpellChecker(){
return spellChecker;
}
public void spellCheck(){
spellChecker.checkSpelling();
}
}
基于JAVA的配置
@Configuration 和 @Bean 注解
- @Configuration 的注解类表示这个类可以使用 Spring IoC 容器作为 bean 定义的来源。
@Bean 注解告诉 Spring,一个带有 @Bean 的注解方法将返回一个对象,该对象应该被注册为在 Spring 应用程序上下文中的 bean。
一个例子:
1
2
3
4
5
6
7
8
import org.springframework.context.annotation.*;
public class HelloWorldConfig {
public HelloWorld helloWorld(){
return new HelloWorld();
}
}等同于xml中
1
2
3<beans>
<bean id="helloWorld" class="com.tutorialspoint.HelloWorld" />
</beans>带有 @Bean 注解的方法名称作为 bean 的 ID,它创建并返回实际的 bean。你的配置类可以声明多个 @Bean。
- @import 注解允许从另一个配置类中加载 @Bean 定义。
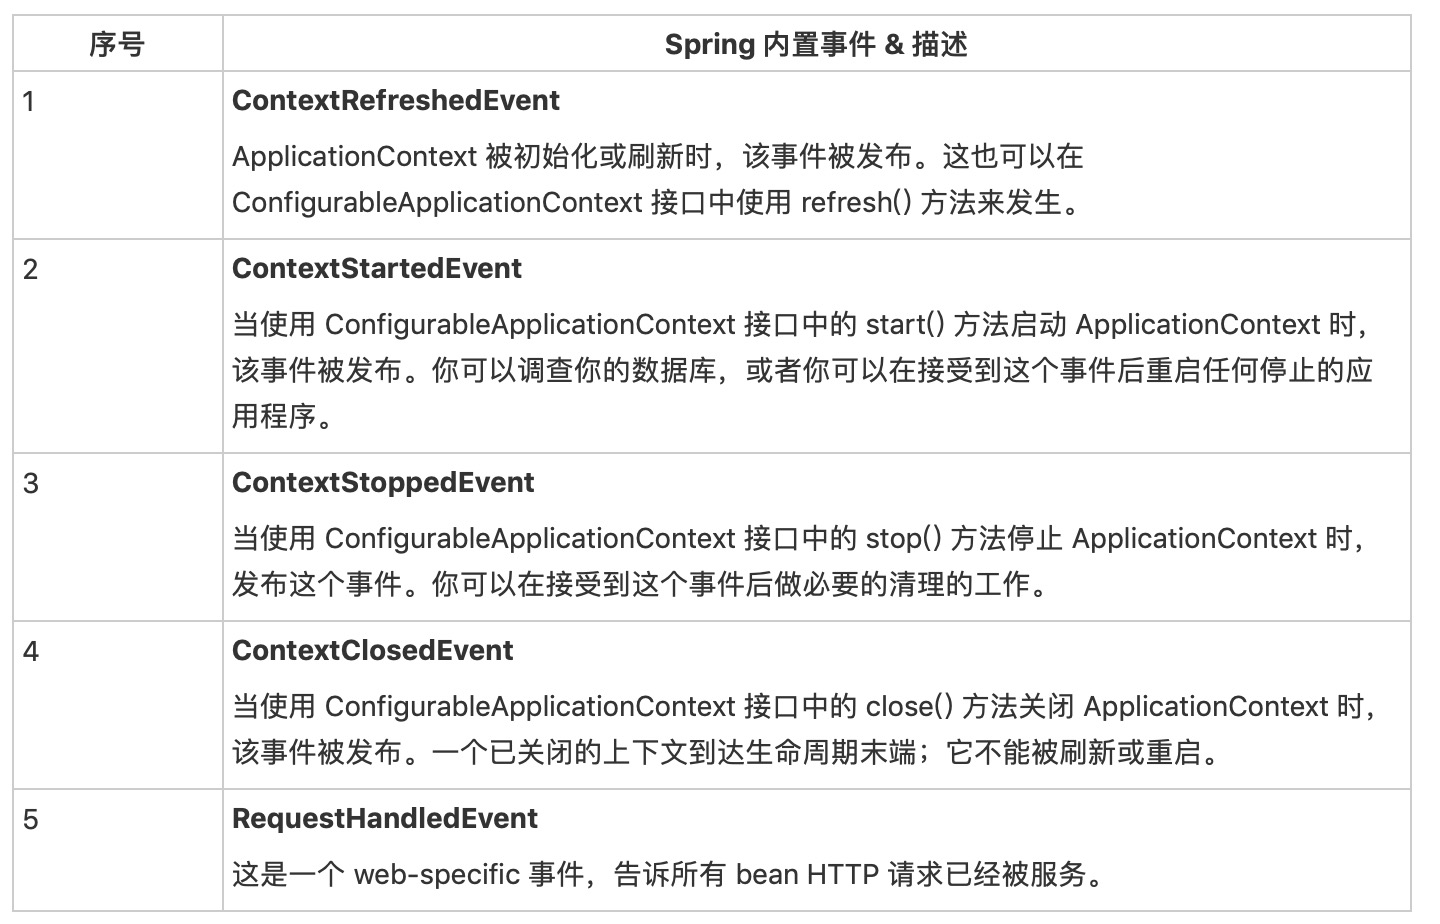
生命周期
Spring 的核心是 ApplicationContext,它负责管理 beans 的完整生命周期。当加载 beans 时,ApplicationContext 发布某些类型的事件。
由于 Spring 的事件处理是单线程的,所以如果一个事件被发布,直至并且除非所有的接收者得到的该消息,该进程被阻塞并且流程将不会继续。
Spring AOP
Spring 框架的一个关键组件是面向方面的编程(AOP)框架。
AOP中的术语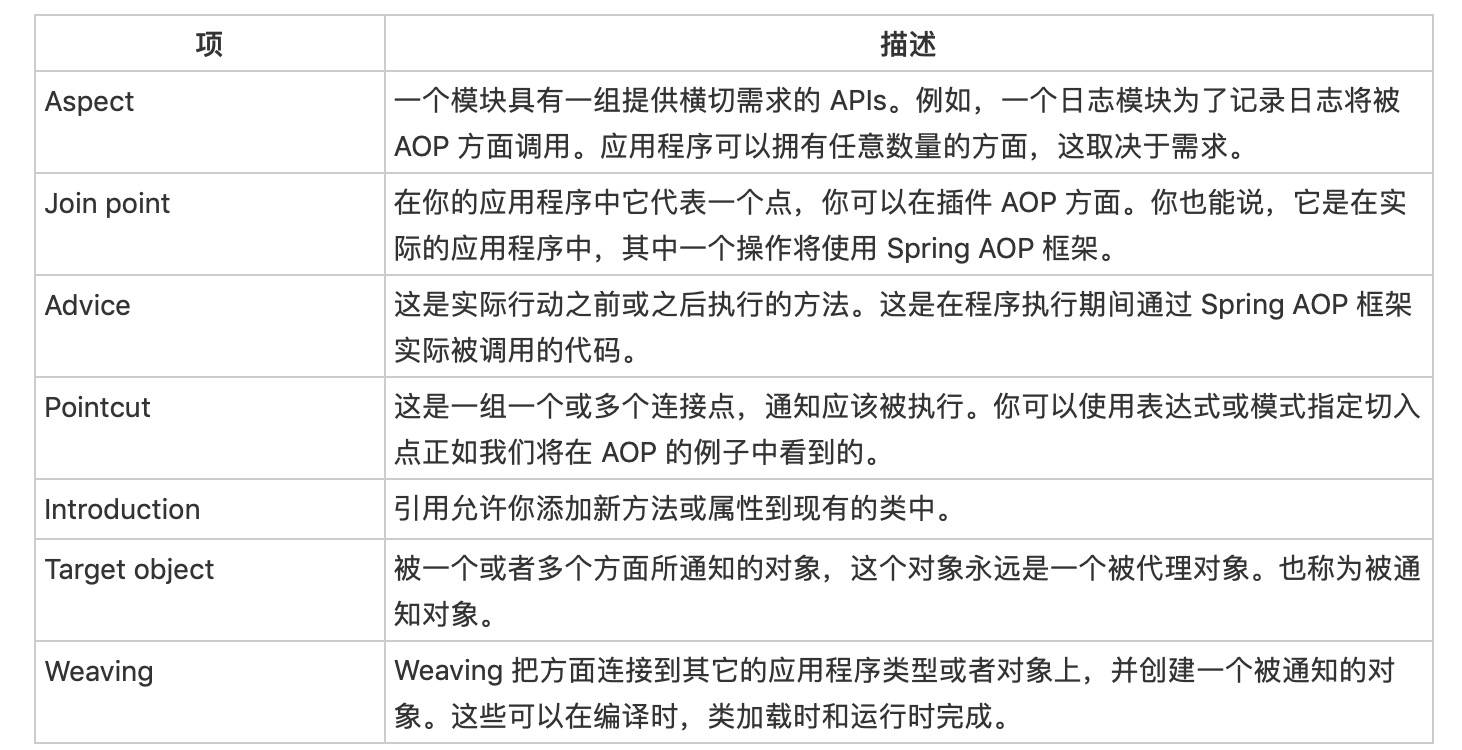
Spring JDBC
Spring JDBC 框架负责所有数据库的低层细节,从开始打开连接,准备和执行 SQL 语句,处理异常,处理事务,到最后关闭连接。
Spring 事务管理
Spring 事务抽象的关键是由 org.springframework.transaction.PlatformTransactionManager 接口定义。
Spring MVC
参考:
W3C School